Important announcement for FreeStyle LibreLink app users.

Make sure you are running the latest FreeStyle LibreLink app – version 2.12.0. 
Having the latest app is key to getting the best performance.

Learn More >

ADC-109380 v1.0

Now is the time to move to the FreeStyle Libre 2 Plus sensor

Do you currently wear a FreeStyle Libre 2 sensor?
The FreeStyle Libre 2 sensor will be discontinued in the UK end of August 2025.
Speak to your healthcare professional to get your prescription updated to the FreeStyle Libre 2 Plus sensor.

Find out how to switch >

ADC-104300 v1.0 11/24

FreeStyle Auto-
Assist Neo Software

Easy-to-use software to help you and your Healthcare Team manage your FreeStyle Optium Neo Blood Glucose and Ketone Monitoring System.

A screenshot of the FreeStyle Auto-Assist software shown on a computer monitor next to a FreeStyle Optium Neo device.

Getting started

To get started:

  • Download the FreeStyle Auto-Assist Neo Software.

  • Connect the yellow USB cable to your FreeStyle Optium Neo meter and an internet-enabled computer.

  • The software will automatically begin the installation process.

A screenshot of the FreeStyle Auto-Assist software shown on a computer monitor next to a FreeStyle Optium Neo device.

Report Overview

FreeStyle Auto-Assist Neo Software includes six reports.
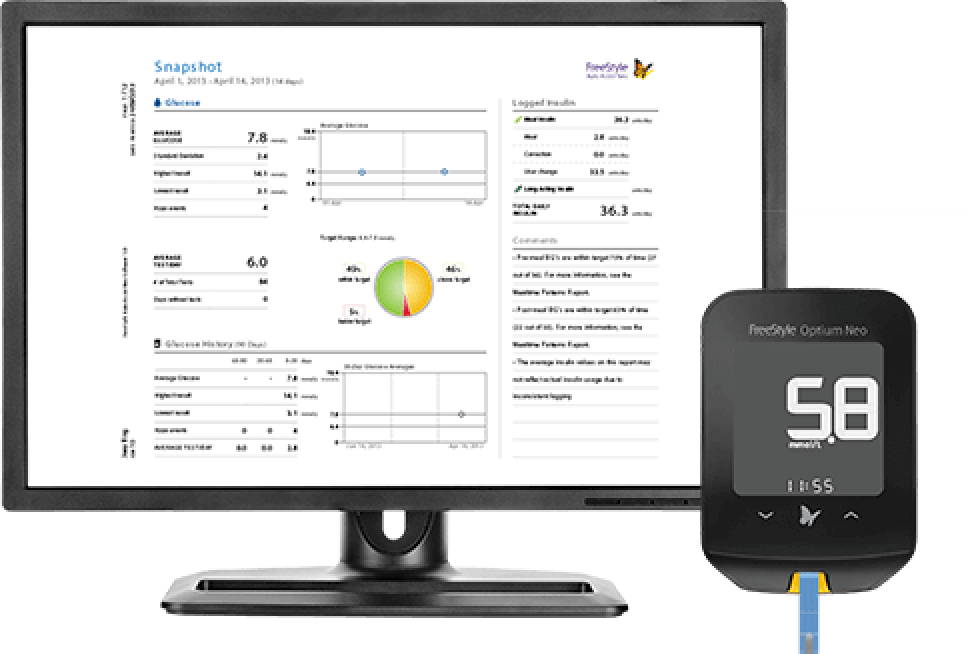
Snapshot

The Snapshot Report provides a data summary for a specified date range, including up to six notes relating to important blood glucose trends.

Screenshot of the snapshot report

Note: You should always consult your Healthcare Professional if you have any questions or concerns about your diabetes management or results.

How to use the software

Creating, printing and saving reports

Step 1: Creating a report

Once the software has installed, you arrive on the Menu page. Connect the meter and click Create Reports.

  • Tick the box next to the reports you want to view or print.

  • Choose the timeframe you want to show data for, using the dropdown box or by entering a custom range. You can select the last 1 to 4 weeks or you can select a custom start and end date.

  • Click Print Reports or View Reports on the screen.

  • The report will appear on the screen automatically. To select other reports, click Back.

WARNING: To avoid the possibility of electric shock, never perform a blood glucose test while the meter is connected to the computer.

Computer screen showing first step of creating a report.

Step 2: Printing a report

To print a report, make sure you've connected your meter and clicked Create Reports.

  • Tick the box next to the reports you want to print.

  • Click Print Reports.

All pages for the selected timeframe will be printed. To limit the number of pages, adjust the timeframe. You can also print a report directly when it's displayed on the screen by clicking the Print button.

Computer screen showing step 2 of printing a report.

Step 3: Saving a report as a PDF

To save a report as a PDF, make sure you've connected your meter and clicked .

  • Create the report you want to save following Step 1.

  • Click Save

  • Choose where you want to save your report, give it a name and click Save again.

All pages for the selected timeframe will be saved. To limit the number of pages, adjust the timeframe period.

Computer screen showing step 3 of saving a report as a PDF.
References & Disclaimers

Images are for illustrative purposes only. Not real patient or data.


ADC-57242 v2.0

Loading...
Loading...
Loading...
Loading...
Loading...
Loading...
Loading...